HELLO EVERYONE!!!!
Hope you guys are doing well.
This week, I will be touching on a topic which may be foreign to some of you. It will be on glycerolization/freezing and deglycerolization/thawing of red blood cells. This process is done in the cryopreservation lab of the blood bank.
Glycerolization/Freezing
Freezing RBCs with glycerol dates back to the 1950s. Frozen RBCs can be stored for up to 10 years for:
1. Patients with rare phenotypes
2. Autologous use
3. In case of national emergencies in which blood cannot be dispositioned out to hospitals quickly enough to prevent expiration.
The resulting deglycerolized product is free of leucocytes, platelets, and plasma due to washing process. Cryoprotective agents can be categorized as penetrating and nonpenetrating. A penetrating agent involves small molecules that cross the cell membrane into the cytoplasm. The osmotic force of the agent prevents water from migrating outward as extracellular ice is formed, preventing intracellular dehydration. An example of a penetrating agent is glycerol. An example of a non-penetrating agent is hydroxyethyl starch (HES). This comprises large molecules that do not enter the cell but instead form a shell around the cell, preventing loss of water and subsequent dehydration.
Two procedures used for glycerolizing RBCs are high glycerol and low glycerol methods. The methods differ in the equipment used, the temperature storage and the rate of freezing. Most blood centres practice the high glycerol method.
High Glycerol (40% w/v)
This method increases the cryoprotective power of the glycerol, thus allowing a slow, uncontrolled freezing process. The freezer is generally a mechanical freezer that provides storage at -80oC. This particular procedure is probably the most widely used because the equipment is fairly simple and the products require less delicate handling. It does however require a large volume of wash solution for deglycerolization. RBCs are frozen within 6 days of collection when the preservative is CPD or CPDA-1 and up to 42 days when preserved in AS-1, AS-3 and AS-5. AABB Standards states RBCs must be placed in the freezer within 4 hours of opening the system. It is advisable to freeze a sample of donor serum in the event additional testing is required for donor screening.
Low Glycerol (20% w/v)
In this method, the cryoprotection of the glycerol is minimal, and very rapid, more controlled freezing procedure is required. Liquid nitrogen (N2) is routinely used for this method. The frozen units must be stored at about -120oC, which is the temperature of liquid N2 vapour. Because of the minimal amount of protection by the glycerol, temperature fluctuations during storage can cause RBC destruction.
Deglycerolization/Thawing
Red cells that have been frozen require thawing and deglycerolization before they can be safely transfused. Glycerol will be removed from RBC to avoid in vivo and/or in vitro heamolysis.
The thawing process takes approximately 30 minutes and involves immersion of units into a 37oC water bath and washing the RBCs with solutions of decreasing osmolarity (eg. 12% NaCl, 1.6% NaCl, 0.9% NaCl, + 0.2% dextrose). An exception to this rule is a donor with sickle cell trait in which RBCs would haemolyze upon suspension in hypertonic solutions; in this case the cells would be washed in 12% NaCl and then 0.9% NaCl with 0.2% dextrose, omitting the 1.6% solution. Automated continuous-flow instruments can be utilized for washing. In our blood bank, a machine called the Haemonetic 215 is used. Once the RBCs have been deglycerolized, the unit is considered an open system with an expiration date of 24hrs and is stored at 1oC to 6oC.
Hope my post this week has enlightened you on some of the processes that occurs in a blood bank. Till next time..... Adios!!!
Rusydiana binte Kusni
TG02
0608485I
Angels n a Demon

Sunday, September 21, 2008

Sunday, September 14, 2008
AMir's back...and its week 12!!!
How is everyone doing?.. wah 3 months of attachment already..thats fast.. 2 more months and we can meet up already..ok what shall i say about this week.. hmmmmmm
PARASITOLOGY!!
For last week I was posted at parasite lab.. In this lab, they mainly deal with protozoans and helminths(i hope you guys remember what we learn in BMic).. if not nvm i shall give a brief intro...
Parasite are organisms that live on or in a host organism, usually causing it some harm. They are relatively smaller in size and are dependent on their host for nourishment. There are many forms of parasites like, arthropod parasites (ticks), plant parasites (mistletoe), single-celled protozoan (amoebas) and even viruses. Numerous parasites live in the gastrointestinal tract, known as intestinal parasites which are common human pathogens. Parasite are subdivided into protozoans (unicellular) and helminths ova/larva (multicellular)
Eg of protozoans include: Amoeba histolytica, Giardia lamblia, Cryptosporidium
Eg of helminths include: Roundworms (Ascaris lumbricoides), tapeworm, flatworms
Parasite infections in Singapore is not as common as bacterial infections. So, we do not recieve much specimens. There are many different tests carried out: Ova and Parasite Exam, Silver stain for Pneumocystis jirovecii (PCP), leukocytes examination and occult blood. For this blog i will focus more on Ova and Parasite exam
Ova & Parasite exam
Ova and parasite exam is basically analysis of stool to check for the presence of a parasite or worm-like infection of the intestine. Most of the specimens, or i shall say ALL of the specimens are stool specimens, as intestinal parasites there will be released in the stool of infected humans. There will be a large population of parasites in the stool, there it will be easier to detect the presence of this parasites.
Principle

1. Using a disposable ice-cream stick, place fresh faeces into the PVA fixative in the
Slides ready to be stained ratio of 3 parts PVA fixatives to 1 part faeces.
2. Mix thoroughly so that it appears homogenous
3. Allow the faeces to fix for a minimum of 30mins; overnight fixation is acceptable
4. Pipette out some of the well-mixed PVA-faecal mixture onto a paper towel using a disposable Pasteur’s pipette and allow to stand for 3mins to absorb out the excess PVA (This step is critical to obtain the best possible stain)
5. With an applicator stick, apply some of the faeces from the paper towel onto a clean slide (Spread the material onto the edge of the slide for better adherence)
6. Dry the slides for 3 hours or overnight at room temperature (Slide must be dried thoroughly to prevent material from being washed off during staining)
B. Concentration procedure
1. Add 10 drops of surfactant into the ParaPak specimen vial
2. Insert the filtration tightly into the specimen vial
3. Invert assembled unit, tapping sharply to force the solution into the conical tube
4. Unscrew the filtration unit and discard appropriately
5. Add 10% Formalin to the dotted line, plus 5 ml of Ethyl Acetate (Clearance)
6. Tightly screw the cap and shake vigorously for 1min
7. Centrifuge at 1500xg for 10mins
8. After centrifugation the specimen is clearly separated into four layers
9. Using an applicator stick, rim the debris layer. Pour off the debris and supernatant fluid, leaving the sediment
10. With the tube still inverted, use a cotton swab to clean and remove the remaining debris
11. Return the tube to upright position and add a few drops of saline to mix the sediment
C. Wet Mount
1. Using an applicator stick, prepare a coverslip preparation from the sediment
2. Examine microscopically
D. Trichrome Staining
1. Place slide in Trichrome stain solution for 10mins
2. Destain by placing the slide in acidified alcohol for 1-3sec (Do not allow slides to remain in this solution)
3. Dip slide several times in 100% ethyl alcohol
4. Place slide in 2 additional changes of 100% ethyl alcohol for 5mins each
5. Place slide in 2 changes of xylene substitute for 5mins each
6. Mount in immersion oil, using a No.1 thickness cover glass
7. Examine microscopically
Conclusion
In Trichrome stain, cytoplasm of cysts and trophozoites will stain blue-green tinged with purple. Parasite eggs and larvae usually stain red. All ova, pathogenic protozoan trophozoites or cysts seen must be reported. The reports will be sent to the doctors, and they will decide whether to do any further confirmatory tests depending on the patient's clinical symptoms.%2520in%2520mucus%2520string,fixed%2520great.jpg) image taken from: http://www.med-chem.com/Para/prob%20of%20month/IMAGES/Giardia,%20trophs%20(2)%20in%20mucus%20string,fixed%20great.jpg
image taken from: http://www.med-chem.com/Para/prob%20of%20month/IMAGES/Giardia,%20trophs%20(2)%20in%20mucus%20string,fixed%20great.jpg
AmiR
TG02
PARASITOLOGY!!
For last week I was posted at parasite lab.. In this lab, they mainly deal with protozoans and helminths(i hope you guys remember what we learn in BMic).. if not nvm i shall give a brief intro...
Parasite are organisms that live on or in a host organism, usually causing it some harm. They are relatively smaller in size and are dependent on their host for nourishment. There are many forms of parasites like, arthropod parasites (ticks), plant parasites (mistletoe), single-celled protozoan (amoebas) and even viruses. Numerous parasites live in the gastrointestinal tract, known as intestinal parasites which are common human pathogens. Parasite are subdivided into protozoans (unicellular) and helminths ova/larva (multicellular)
Eg of protozoans include: Amoeba histolytica, Giardia lamblia, Cryptosporidium
Eg of helminths include: Roundworms (Ascaris lumbricoides), tapeworm, flatworms
Parasite infections in Singapore is not as common as bacterial infections. So, we do not recieve much specimens. There are many different tests carried out: Ova and Parasite Exam, Silver stain for Pneumocystis jirovecii (PCP), leukocytes examination and occult blood. For this blog i will focus more on Ova and Parasite exam
Ova & Parasite exam
Ova and parasite exam is basically analysis of stool to check for the presence of a parasite or worm-like infection of the intestine. Most of the specimens, or i shall say ALL of the specimens are stool specimens, as intestinal parasites there will be released in the stool of infected humans. There will be a large population of parasites in the stool, there it will be easier to detect the presence of this parasites.
Principle
- Ova and parasite exam is the most common performed procedure in diagnostic parasitology
- For identification of intestinal protozoan parasites, it is based on the recognition of their cyst or trophozoites stages or even both
- Cysts are spherical with smooth uniform walls formed during the dormant resting stage
- Trophozoites have thin limiting membrane with variations in size and shape, they are formed during active feeding stage
- For Helminthic infections, it is based on identification of eggs, larvae or proglottids in faeces
- Eggs or ova are usually found in stool specimen as it is passed out in faeces
- Ova and parasite exam consists of 3 separate protocols: Direct wet mount, Concentration and Permanent stained smear
- Direct wet mount allows detection of motile protozoans tryphozoites and helminth worms
- Concentration is designed to facilitate recovery of protozoan cysts, coccidian oocysts, microsporidial spores, and helminth eggs and larvae.
- Formalin-ethyl acetate sedimentation method is used to prepare concentrated specimen for direct wet mount.
- Permanent stained smear is used to identify intestinal protozoa, using the common Trichrome stain method
- It is the most important procedure as it aids in the confirmation of any suspicious objects seen in the direct wet mount
 image taken from: http://www.stanford.edu/group/parasites/ParaSites2006/Giardiasis/images/Giardia_LifeCycle%20cdc.gif
Materials
- Para-Pak® ULTRA Zn-PVA fixative
- Para-Pak® Macro-Con® Kit
- Surfactant bottle (30ml)
- Conical 50ml centrifuge tubes with filtration units and screw caps - Disposable ice-cream stick and applicator sticks
- Disposable Pasteur’s pipette
- Paper towel
- Microscopic slides
- Timer
- 10% Formalin
- Ethyl acetate (Clearance)
- Disposable cotton swabs
- Normal saline
- Trichrome stain
· For destaining: 10% acetic acid in water, 50% and 70% ethyl alcohol
Procedures
A. Preparation of material for Trichrome staining1. Using a disposable ice-cream stick, place fresh faeces into the PVA fixative in the
Slides ready to be stained ratio of 3 parts PVA fixatives to 1 part faeces.
2. Mix thoroughly so that it appears homogenous
3. Allow the faeces to fix for a minimum of 30mins; overnight fixation is acceptable
4. Pipette out some of the well-mixed PVA-faecal mixture onto a paper towel using a disposable Pasteur’s pipette and allow to stand for 3mins to absorb out the excess PVA (This step is critical to obtain the best possible stain)
5. With an applicator stick, apply some of the faeces from the paper towel onto a clean slide (Spread the material onto the edge of the slide for better adherence)
6. Dry the slides for 3 hours or overnight at room temperature (Slide must be dried thoroughly to prevent material from being washed off during staining)
B. Concentration procedure
1. Add 10 drops of surfactant into the ParaPak specimen vial
2. Insert the filtration tightly into the specimen vial
3. Invert assembled unit, tapping sharply to force the solution into the conical tube
4. Unscrew the filtration unit and discard appropriately
5. Add 10% Formalin to the dotted line, plus 5 ml of Ethyl Acetate (Clearance)
6. Tightly screw the cap and shake vigorously for 1min
7. Centrifuge at 1500xg for 10mins
8. After centrifugation the specimen is clearly separated into four layers
9. Using an applicator stick, rim the debris layer. Pour off the debris and supernatant fluid, leaving the sediment
10. With the tube still inverted, use a cotton swab to clean and remove the remaining debris
11. Return the tube to upright position and add a few drops of saline to mix the sediment
C. Wet Mount
1. Using an applicator stick, prepare a coverslip preparation from the sediment
2. Examine microscopically
D. Trichrome Staining
1. Place slide in Trichrome stain solution for 10mins
2. Destain by placing the slide in acidified alcohol for 1-3sec (Do not allow slides to remain in this solution)
3. Dip slide several times in 100% ethyl alcohol

4. Place slide in 2 additional changes of 100% ethyl alcohol for 5mins each
5. Place slide in 2 changes of xylene substitute for 5mins each
6. Mount in immersion oil, using a No.1 thickness cover glass
7. Examine microscopically
Conclusion
In Trichrome stain, cytoplasm of cysts and trophozoites will stain blue-green tinged with purple. Parasite eggs and larvae usually stain red. All ova, pathogenic protozoan trophozoites or cysts seen must be reported. The reports will be sent to the doctors, and they will decide whether to do any further confirmatory tests depending on the patient's clinical symptoms.
image taken from: http://www.med-chem.com/Para/prob%20of%20month/IMAGES/Giardia,%20trophs%20(2)%20in%20mucus%20string,fixed%20great.jpgSo, thats about all!!!.. I shall be back sooon!!.. take care peeps!!
AmiR
TG02
Saturday, September 6, 2008
week 11 already people!!
Know what? I'm really having a hard time finding what to blog about, considering most of the tests have already been posted. Haha.
Well anyways, I've finally decided to write about a test to detect anti-Mycoplasma pneumoniae antibodies, using SERODIA-MYCO II (also known as MPA), since now I'm currently in serology department. Alot of manual tests, if I may say.
First of all, Mycoplasma pneumoniae is a very small kind of bacterium that is usually associated with upper respiratory tract infections, together with fever, headaches, cough and malaise. It may lead to tracheobronchitis, which is a common respiratory infection characterized by inflammation of the trachea and bronchi. Its mode of transmission is person-to-person transmission by direct contact with the infected respiratory secretions, and it will usually take about 1-4 weeks before the symptoms will develop.
Principle
SERODIA-MYCO II is used in the detection of antibodies to Mycoplasma pneumoniae. It uses gelatin particles which are sensitized with extracted cell membrane components of Mycoplasma pneumoniae. Serum containing specific antibodies will react with the sensitized couloured gekatin particles to form a smooth mat of agglutinated particles in the microtitration tray.
Reagents
SERODIA-MYCO II kit, which includes:
Well anyways, I've finally decided to write about a test to detect anti-Mycoplasma pneumoniae antibodies, using SERODIA-MYCO II (also known as MPA), since now I'm currently in serology department. Alot of manual tests, if I may say.
First of all, Mycoplasma pneumoniae is a very small kind of bacterium that is usually associated with upper respiratory tract infections, together with fever, headaches, cough and malaise. It may lead to tracheobronchitis, which is a common respiratory infection characterized by inflammation of the trachea and bronchi. Its mode of transmission is person-to-person transmission by direct contact with the infected respiratory secretions, and it will usually take about 1-4 weeks before the symptoms will develop.
Principle
SERODIA-MYCO II is used in the detection of antibodies to Mycoplasma pneumoniae. It uses gelatin particles which are sensitized with extracted cell membrane components of Mycoplasma pneumoniae. Serum containing specific antibodies will react with the sensitized couloured gekatin particles to form a smooth mat of agglutinated particles in the microtitration tray.
Reagents
SERODIA-MYCO II kit, which includes:
- Sensitized particles
- Unsensitized partiles
- Positive control
- Sample diluent
Procedures
6 wells are required for a patient's sample
4 wells are required for control
- Label the wells (ID number or Control)
- Add 100ul of sample diluent to the first wells
- Add 25ul of sample diluent to the rest of the wells
- Add 25ul of positive control to the first well and mix well
- Bring 25ul of the mixed solution to the next well and mix well
- Repeat Step 5 until the last well, where 25ul will be discarded after mixing
- Repeat Steps 4-6 with patient's sample
- Add one drop of unsensitized particles into the second wells
- Add one drop of sensitized psricles into the rest of the wells starting from well 3
- Tap at the sides of the microtitration plate gentle to ensure proper mixing
- Cover the plate and incubate at room temperature
- Results to be read 3 hours later
Interpretation
Negative (-):
Definite compact button in the center of well with smooth round outer margin
Positive (+):
Definite large ring with firmly agglutinated particles spread within the circle
Positive (++):
Agglutinated particles spread out to cover th bottom of the well entirely
MAYAFIRHANA
TG02
Saturday, August 30, 2008
Hello my fellow peepz!! How have all of you been doing? I’m sure everyone is going through different experiences every single day right? For me, so far, I have learnt more than what I have expected. Even if it is tiring me out almost everyday.
So for this post, I will be talking about what I have been learning in the Clinical Chemistry section.
The basic thing that we need to do is to label and load the samples correctly. Thus, we need to know what tubes is needed for which tests as different tubes is different. For EDTA tubes, it is mainly used for hematology section and GHB. Heparin, Gel and plain tubes can be use for many of the tests. Fluoride tube is used mainly for glucose, particularly fasting.
Before we label, we are to check if the specimens is sufficient to be load onto the machines. If it is more than half of the tube, it is considered sufficient. For the sufficient samples, after labeling, we can load directly into the pre-analytical machine which will be explained in further detail later on.
In this section, there are three main machines or equipments that are used to process the samples. They are the MPA, SWA and Cobas where MPA is used for the pre-analytical processing and SWA and Cobas are used for analysis. Examples of pre-analytical process done on the MPA are centrifugation, aliquoting and labeling. After going through the MPA, the samples will either proceed to the SWA or be aliquot out to be process in the Cobas. So what determines the samples to be run in the SWA or Cobas respectively? Well, it all depends on the different types ordered for that specific samples. Most of the tests can be run on either machines. However, there are some tests that are only specific to SWA or Cobas. Some examples are shown below:
Tests that can only be run in SWA:
- Hepatitis panel
- Cortisol(Serum)
- AFP
- CEA
- PSA
- Pro-BNP
- AHAV total
- HIV
Tests that can only be run in Cobas:
- TDM
- CRP
- GHB
- Anaemia panel 1 & 2
- Magnesium
- Amylase
- Urine tests
- Fluid tests
- C3 & C4
- Direct Bilirubin
- RF
Other tests like renal panel and liver function test can be load on both machines.
There are several circumstances when we are not able to use the MPA for the pre-analytical processing. It could be due to some technical breakdown or when the sample given is insufficient for the MPA to process.
If it is less than half, we are to spin it down and aliquot the serum into the secondary tube. If it is too little, we will use the hitachi cups. Then, we have to load the tube or cups directly to either the SWA or Cobas, depending on the tests ordered. One thing to take note during putting of tubes to each machine manually is that the tubes must not be capped.
For samples requesting for special chemistry tests, the serum is required to be stored in the fridge or freezer. These also depend on the different tests requested. Some examples are shown below:
In freezer – ACTH, PTH and TRAB
In fridge – HbsAg, HCV, HIV, TPO, CA199, Syphillis and Cortisol(urine)
For samples that request for HbsAg, HIV and cortisol(urine), the request form is needed to be kept in the special chemistry bench.
See you all soon!!
Anw, happy fasting to all of my muslim frens!! Shall meet up to break fast together aite??
Nur Sofieyana
TG02
Sunday, August 24, 2008
week 9 of SIP.
hello future med techs. hehe....
hope ur attachment's going fine, mine's okay =)
So now, i would like to share with you a test that is simple but yet important that is done in the Biochemistry Lab.
Test name: G6PD Screening
First, lets just briefly recap on what G6PD is. Glucose-6-phosphate dehydrogenase, G6PD, is a key enzyme needed for the hexose monophosphate pathway which produces NADPH, essential for erythrocyte membrane integrity.This condition might result to destruction of RBCs, leading to hemolytic anemia, followed by jaundice. Thus, for newborns with jaundice, they have their blood sampled to check if the baby's jaundice is caused by G6PD deficiency.
How the test is done:
Patient's sample collected in EDTA tube to prevent clotting.
Patient's tube is overturned 2-3 times to ensure a homogenous composition when sample is taken out.
Using a pipette, 5 microlit of patients whole blood was transferred onto a seperate tube containing 100 microlit of reagent that contains G6-P and NADP.
The mixture is left to sit for 5 minutes.
Below is an equation for the reaction that should take place in the presence of G6PD:

10 microlit of mixture is pipetted out and transferred onto a filter paper.
The filter paper is dried for ten minutes and then viewed under long UV wave in the ulraviolet viewing cabinet.
As seen from the equation above, G6PD is needed for the reaction to take place. The presence of G6PD can be known by viewin the filter paper under the UV light in the ultraviolet viewing cabinet. NADPH flouresces under long wave UV light and a flourescence would indicate the presence of G6PD. In contrast, a sample that does not contain G6PD would not give out any flourescence when viewed under the long wave UV light.
4 controls are set up at the same time:
1. G6PD deficient
2. Intermediate G6PD deficient
3. Bblank (only reagent present)
4. G6PD present
The controls are used as a guide for the patient's results.
For example, a G6PD deficient control does not flouresce at all while an intermediate G6PD control floureses slightly. From the controls, we can gauge the if the patient is completely deficient of G6PD or an intermediate case.
However, this test is just a screen. Samples of patients with positive results are sent out to another laboratory in a hospital for further testing.
feel free to ask ny questions. hope you like my post =)
raihana~
Sunday, August 17, 2008
Week Number Eight
Hellohello!!! How are you ppl doing? I hope you guys are doing great. This week, it is my turn again to share my experience. For the past few weeks, I have been rotating about, going to a different lab every week. Quite a lot to absorb for such a short period, but I’ll manage.
I was posted to an infectious disease testing lab one of the weeks. For your information, upon donation, a few samples of blood will be collected from donors to undergo testing, such as infectious disease testing, blood group testing and antibody screening. Under infectious disease itself, it is further divided into a few sections. And the section I am going to explain is TPHA lab.
TPHA is the short form for Treponema pallidum (TP) haemagglutination assay. TP causes Syphilis which is a sexually transmitted disease. The route of transmission is almost always through sexual contact. However, it can also be transmitted through blood transfusions. Therefore, it is important to screen all donors for TP so as to prevent any harmful transmissions and transfusions.
In the TPHA lab, the machine used is the ABBOTT ARCHITECT Syphilis TP. Its intended use is for the diagnosis of Syphilis.
PRINCIPLE OF ASSAY
I was posted to an infectious disease testing lab one of the weeks. For your information, upon donation, a few samples of blood will be collected from donors to undergo testing, such as infectious disease testing, blood group testing and antibody screening. Under infectious disease itself, it is further divided into a few sections. And the section I am going to explain is TPHA lab.
TPHA is the short form for Treponema pallidum (TP) haemagglutination assay. TP causes Syphilis which is a sexually transmitted disease. The route of transmission is almost always through sexual contact. However, it can also be transmitted through blood transfusions. Therefore, it is important to screen all donors for TP so as to prevent any harmful transmissions and transfusions.
In the TPHA lab, the machine used is the ABBOTT ARCHITECT Syphilis TP. Its intended use is for the diagnosis of Syphilis.
PRINCIPLE OF ASSAY
- The ABBOTT ARCHITECT Syphilis TP assay is a two-step immunoassay for the qualitative detection of antibody to Treponema Pallidum (TP) in human serum or plasma using Chemiluminescence Microparticle Immunoassay (CMIA) technology with flexible assay protocols, referred to as Chemiflex.
- In the initial step, sample and microparticle coated with recombinant TP antigens (TPN15, TPN17, TPN47) together with the Assay Diluent are combined. Anti-TP antibodies present in the sample bind to the TP coated microparticles. After washing, the acridinium-labelled anti-human IgG and IgM conjugate is added in the second step. Following another wash cycle, Pre-Trigger and Trigger Solutions are added to the reaction mixture.
- The resulting chemiluminescent reaction is measured in relative light units (RLUs). A direct relationship exists between the amount of Anti-TP antibodies in the sample and the RLUs detected by the ABBOTT ARCHITECT i optical system.
- The presence or absence of Anti-TP antibodies in the sample is determined by comparing the chemiluminescent signal in the reaction to the cutoff signal determined from the ABBOTT ARCHITECT Syphilis TP calibration. If the chemiluminescent signal in the sample is greater than or equal to the cutoff signal, the sample is considered reactive for Anti-TP.
The specimen used for this assay is either serum or plasma. Haemolysed samples should not be used and all fibrin clots or bubbles must be removed before loading of samples
In the event where there is a positive result, confirmatory tests must be performed. Serum or plasma samples will be collected in a tube and sent to the Serology Laboratory, Department of Pathology, Singapore General Hospital (Reference Laboratory).
The following confirmatory tests are ordered for the determination of the donor’s infection status:
a) Treponema pallidum Particle Agglutination (TPPA) test – an alternative treponemal screening test
b) Venereal Disease Research Laboratory (VDRL) test – a non-treponemal test to determine current or recently treated infection status
c) LIA(Line Immuno Assay) – Syphilis (LIA) – as the confirmatory test for the presence of treponemal antibodies
I hope what I have shared this time round has been a beneficial one. 12 more weeks to go and back to school!! Alright, time to go... see ya
Rusydiana binte Kusni
0608485I
TG02
Sunday, August 10, 2008
WEEK 7!!!
Hello everyone!! HOw are your SIP??.. I hope everything's okay, Well I'm having a great in my Micro Lab. For now, I'm in the investigation lab for 1 month where they try to identify the microganisms in the patient's samples. There are quite a number of tests carried out, especially all the biochemical tests( i hope you guys remember). For this week, I learn more about Streptex. I know you guys will be like, "HUH What is Streptex??" . Ok let me tell you...
Streptococcus Latex Agglutination (Streptex)
Streptex is used to identify the Lancefield groups of Streptococci growing on agar plates
Principle
Lancefield showed that the soluble extracted antigens can be identified by precipitation reactions with homologous antisera. Now, latex agglutination or coagglutination methods have largely superseded precipitation method in determining the different groups. A simple enzyme extraction procedure is carried out. Antigen in the resulting extract is identified using polystyrene latex particles which have been coated with group-specific antibodies. These latex particles agglutinate strongly in the presence of homologous antigen and remain in smooth suspension in the absence of homologous antigen.
Materials Streptex Kit
Streptococcus Latex Agglutination (Streptex)
Streptex is used to identify the Lancefield groups of Streptococci growing on agar plates
Principle
Lancefield showed that the soluble extracted antigens can be identified by precipitation reactions with homologous antisera. Now, latex agglutination or coagglutination methods have largely superseded precipitation method in determining the different groups. A simple enzyme extraction procedure is carried out. Antigen in the resulting extract is identified using polystyrene latex particles which have been coated with group-specific antibodies. These latex particles agglutinate strongly in the presence of homologous antigen and remain in smooth suspension in the absence of homologous antigen.
Materials
Streptex Kit- Streptex Kit contents:Latex for Group A,B,C,D,F,G, extraction enzyme, disposable mixing sticks, disposable reaction cards,
- Disposable Pasteur pipette
- Disposable inoculum loops
Procedure
Preparation of extract from culture growing on solid medium:
1. Dispense 0.4ml Extraction Enzyme into an appropriately labelled test tube for each culture to be grouped. (Usually around 20-30 tubes of 0.4ml Extraction Enzyme are prepared at the same time)
2. Using a disposable inoculums loop, make a light suspension of the culture in a tube containing the enzyme solution.( A single sweep of growth or > 5 large colonies will be sufficient to obtain a result)
3. Incubate the suspension at 35⁰C in an incubator for at least 10 minutes
Group Identification:
1. Resuspend each of the latex suspensions by shaking vigorously for about 5 sec (The kit contains 6 bottles, one specific for each of the groups A,B,C,D,F and G)
2. Expel the contents of the in-dwelling droppers to ensure complete mixing.
3. Dispense one drop (20µl) of each latex suspension onto a separate circle on a clean reaction card.
Note: Dropper bottle should be held vertically to ensure that the drops form at the tip of the nozzle. If the nozzle becomes wet, an incorrect volume will be form around the end and not at the tip.
4. Using a Pasteur pipette, place 1 drop of extract in each of the 6 circles on the reaction card.
5. Mix the contents in each circle in turn with a mixing stick, and spread to cover the complete area of the circle. Use a separate stick for each circle and discard it for safe disposal after use.
6. Rock the card gently for a maximum of 1 min, holding it at a normal reading distance (30cm) from the eyes.
7. Discard the card for safe disposal
8. Keep the reagents back into the refrigerator, using the storage rack provided.
Positive result showing agglutination clumps:
Conclusion
Positive result will show development of an agglutinated pattern showing
clearly visible clumping of the latex particles. Speed and quality of agglutination appearance depends on the strength of the antigen extract. Strong antigen extract will give large clumps of latex particles within a few seconds after mixing. Negative result will show no agglutination and the milky appearance remains unchanged throughout the test. There should only be one latex suspensions showing strong rapid agglutination.
So thats about all!! SEE YOU SOON!!!
AmiR ArshaD
TG02
Sunday, August 3, 2008
6th week!!!
Olla to all yew gorgeous people! 6 weeks have already gone by and here i am again. Let's cut to the chase shall we?
This week is about....
JENG JENG JENG
SERUM BILIRUBIN~
or at least, testing for bilirubin level in neonatal serum.
As all of us know, babies (especially newborns) have a high probability to be jaundiced. Jaundice during the first 24hrs are usually pathological and are most lkely to be due to either blood group incompatibility or infection. An increase in destruction of RBCs will cause an increase in unconjugated bilirubin, which, in the circulation, will bind to albumin. Once all albumin are fully saturated, the excess unconjugated bilirubin -being lipophillic- can enter the cells. They can also cross the blood brain barrier. There, they can bind to proteins in the brain where it is neurotoxic, and therefore, may result in death or severe mental handicap.
Neonatal jaundice occurs as the liver of the newborns are still incapable of metabolizing the bilirubin. Jaundice in full-term babies usually resolves rapidly. In premature babies, however, the jaundice may be more severe as their liver function is not fully mature.
In the lab I'm attached to, we measure the serum bilirubin using
Wako - Bilirubin Tester II
This week is about....
JENG JENG JENG
SERUM BILIRUBIN~
or at least, testing for bilirubin level in neonatal serum.
As all of us know, babies (especially newborns) have a high probability to be jaundiced. Jaundice during the first 24hrs are usually pathological and are most lkely to be due to either blood group incompatibility or infection. An increase in destruction of RBCs will cause an increase in unconjugated bilirubin, which, in the circulation, will bind to albumin. Once all albumin are fully saturated, the excess unconjugated bilirubin -being lipophillic- can enter the cells. They can also cross the blood brain barrier. There, they can bind to proteins in the brain where it is neurotoxic, and therefore, may result in death or severe mental handicap.
Neonatal jaundice occurs as the liver of the newborns are still incapable of metabolizing the bilirubin. Jaundice in full-term babies usually resolves rapidly. In premature babies, however, the jaundice may be more severe as their liver function is not fully mature.
In the lab I'm attached to, we measure the serum bilirubin using
Wako - Bilirubin Tester II
 Analysis Principles:-
Total bilirubin concentration is obtained by measuring the absorbance in the serum. The wavelength is set at 455nm.
Range:-
0 - 1 day 2.0 - 6.0 mg/dL
2 - 5 days 3.9 - 6.0 mg/dL
5 - 127 days 0.3 - 1.7 mg/dL
Specimen:- 
2 fully filled heparinized capillary tubes
Equipment:-
Wako-bilirubin Tester II
Centrifuge (3500 rpm/min, 10minutes)
Procedure:-
- Turn power to ON position & allow 10minutes for lamp to stabilize (Temperature control procedure).
- Pull out the cell holder and insert a capillary tube (containing distilled water) in front of the slit. Push the cell holder back into the bilirubin tester.
- Turn the ANA-SET change-over switch to the SET position.
- Set the Digital Display to ZERO by adjusting the Zero-adjustment control for the 455nm (Filter Selection Lever in the upper position).
- Using the left hand, push down & hold the Filter Selection Lever in the 575nm (lower position). Set the Digital Display to ZERO by adjusting the zero-adjustment control for 575nm with the right hand.
- Release the Filter Selection Lever and allow it to return to 455nm position.
- Pull out the cell holder and set the Digital Display to the standard value by adjusting the Span-adjustment control.
- Turn the AVA-SET chenge-over switch to the ANA position.
- Insert a capillary tube filled with sample (already centrifuged) into the cell holder.
- Push down & hold the Filter Selection Lever into the 575nm posititon. Confirm that the Digital Display at ZERO, then allow level to return back to 455nm position.
- Read the Digital Display & read results.
- To measure subsequent samples, repeat steps 9 - 11.
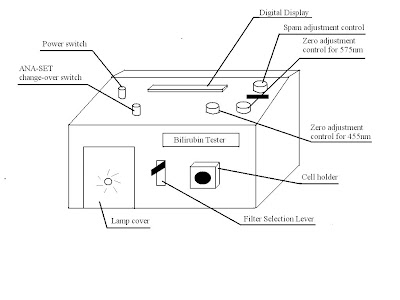

All pictures taken with permission from supervisor.
So, there you go. Seems complicated, but very simple really. Any doubts, feel free to ask =)
Enjoy your SIPs people!!!!
Enjoy your SIPs people!!!!
Name: Mayafirhana
Class: TG02
Friday, August 1, 2008
LMQA
Name: Mayafirhana Bte Hairulhassan
Subject title: Laboratory Management and Quality Assurance
Topic: Organization or regulatory bodies that regulate the operations of local laboratories in Singapore
Subject title: Laboratory Management and Quality Assurance
Topic: Organization or regulatory bodies that regulate the operations of local laboratories in Singapore
The Workplace Safety and Health (WSH) Council collaborates with the Ministry of Manpower (MOM) to help other industries to achieve 'A safe and healthy workplace for everyone; and a country reowned for best practices in workplace safety and health'.1
The WSH Council:
- Help recognize and practice proper safety and health in the employees when working.2
- Created the Construction Safety Audit Scoring System (ConSASS) which offers an independent evaluation of the safety and health management system at the company.3
- Provides surveillance to keep track and control the health of the employees, and the hazards found at the worksite.4
- Workplace Safety and Health Strategy 2015. (2008). Retrieved 31 July, 2008, from: http://www.wshc.gov.sg/WSH2015.html
- The Expansion of the WSH Act. (2008). Retrieved 31 July, 2008, from: http://www.wshc.gov.sg/pub_guidelines.html
- About ConSASS. (2008). Retrieved 31 July, 2008, from: http://www.wshc.gov.sg/ConSASS.html
- Health and Environmental Surveillance. (2007). Retrieved 31 July, 2008, from: http://mom.gov.sg/publish/momportal/en/communities/workplace_safety_and_health/maintaining_a_safe_workplace/health_and_environmental.html
Laboratory Management and Quality Assurance
Name: Mohamed Amir bin Mohamed Arshad
Subject Title: Laboratory Management and Quality Assurance
Topic: Organization or regulatory bodies that regulate the operations of local laboratories in Singapore
Ministry of Health (MOH) regulates clinical laboratory in Singapore, providing consistent, safe and affordable healthcare services(1) to all Singaporeans by implying to various Legislative Acts.
The regulating acts ranges from healthcare professional to related medicinal substances.(2)
There is the Medicines Act which consists of suitable administration, quality and analysis of drugs, and good clinical practices. (3)
MOH implements new regulatory framework to make sure Singaporeans are updated on healthcare services. For example, in the recent liposuction cases, MOH maintains the safety and confidentiality of the patients. Hence any clinic that carries out liposuction must acquire approval from the Ministry. (4)
1. About MOH. (2007). Retrieved 31 July, 2008, from: http://www.moh.gov.sg/mohcorp/about.aspx?id=82
2.Legislation. (2007). Retrieved 31 July, 2008, from: http://www.moh.gov.sg/mohcorp/legislations.aspx?id=214
3.Medicine Acts (2008). Retrieved 31 July 2008, from:
http://statutes.agc.gov.sg/non_version/cgi-bin/cgi_retrieve.pl?actno=REVED-176&doctitle=MEDICINES%20ACT%0A&date=latest&method=part
4.Liposuction Regulatory Framework (2008). Retrieved 31 July 2008, from:
http://www.moh.gov.sg/mohcorp/default.aspx
Subject Title: Laboratory Management and Quality Assurance
Topic: Organization or regulatory bodies that regulate the operations of local laboratories in Singapore
Ministry of Health (MOH) regulates clinical laboratory in Singapore, providing consistent, safe and affordable healthcare services(1) to all Singaporeans by implying to various Legislative Acts.
The regulating acts ranges from healthcare professional to related medicinal substances.(2)
There is the Medicines Act which consists of suitable administration, quality and analysis of drugs, and good clinical practices. (3)
MOH implements new regulatory framework to make sure Singaporeans are updated on healthcare services. For example, in the recent liposuction cases, MOH maintains the safety and confidentiality of the patients. Hence any clinic that carries out liposuction must acquire approval from the Ministry. (4)
1. About MOH. (2007). Retrieved 31 July, 2008, from: http://www.moh.gov.sg/mohcorp/about.aspx?id=82
2.Legislation. (2007). Retrieved 31 July, 2008, from: http://www.moh.gov.sg/mohcorp/legislations.aspx?id=214
3.Medicine Acts (2008). Retrieved 31 July 2008, from:
http://statutes.agc.gov.sg/non_version/cgi-bin/cgi_retrieve.pl?actno=REVED-176&doctitle=MEDICINES%20ACT%0A&date=latest&method=part
4.Liposuction Regulatory Framework (2008). Retrieved 31 July 2008, from:
http://www.moh.gov.sg/mohcorp/default.aspx
Subscribe to:
Posts (Atom)
 RSS Feed (xml)

%20in%20mucus%20string,fixed%20great.jpg)
